Saturday, February 18, 2012

Himayalan Sweetbox "Fragrant Mountain"

At this time of year, I find myself in search of the Sarcococca. I know it's out there, one of buildings close to were I work has a beautiful display outside of the entrance. It's just amazing to walk by and get this wonderful perfume at such a gloomy part of the year, February. I always stop by for a long sniff.

No that I'm slowly acquiring plants for my yard, this was a must have for me.


The flowers might be small but when they are blooming you'll know. As suggested, I'm going to be planting this small shrub by my front door. It will handle the shade well in this area.

New Stuff For The Greenhouse


To make potting up a little easier, I picked this up. No more soil spilling through the cracks in the potting bench.


My first plant to pot up in my new tray was this Begonia "Champagne" I've never grown a tuberous Begonias before, but for a couple of bucks I thought I would try, the picture looked really pretty.


Following the directions, I placed the tuber 2 inches below soil surface.


There we go, we'll see how it grows.

The description of the plant:


Sensational Double flowers of a rare ''champagne'' colour, with green foliage having distinct bronze markings. Great for hanging baskets, window boxes or as patio plants. Three per container will create a breathtaking display as pictured.

Sunday, February 5, 2012

#supersowsunday

Well #supersowsunday has come and I'm ready, I've finally got the greenhouse all set up with the bottom heat, the right lighting and min night and day temperature schedules.


Hydrofarm 400Watt convertible ballast grow light


After much research on which lighting system to get I ordered my grow light and temperature controller from ACF Greenhouses online.


There were many things to consider. I currently have a 8X8 greenhouse, I had to think about how I'm going to use my greenhouse not only now, but in the future. I'm just getting started with greenhouse growing, and the first thing on my to do list is starting some seeds. I debated getting just some T5 high output florescent lights to get me started, it was limiting me to just that, seed starting. What if in the future I would like to grow a wider variety of plants that require greater light levels. So I thought of an HID light, (the difference in price between the 4 tube 4 foot T5 high output light system and the HID light was only $5 if you can believe it) but then there was the question of what type, Metal Halide or High Pressure Sodium, both serve different purposes. So I decided on both, with a convertible ballast. Then was the question of what wattage. On the ACF website it gave a helpful chart on optimal light outputs on all their lights. After going over that I decided on the 400 Watt as the optimal growing area is 5X5 and secondary is 8X8 which covers the entire area of the greenhouse. Well this should take care of my needs for now and years to come. I think this initial investment will be well worth it in years to come


Sentinel Temperature Controller


Also from ACF Greenhouses online, there were many thermometers to choose from, some were static, maintaining a constant minimum temperature, but I didn't want to go that route. Again I wanted something that would suite my needs now and for a long time in the future. I opted for the Sentinel Digital Day and Night Controller with a built in photo sensor. It has a button for the min/max temperature for the last 24 hours, it also works for heating and cooling (not at the same time)


The all important heater, I opted for the oil filled space heater purely because it was something I already had and wasn't currently using, and it has been working out great.


The current set up with a bottom heat/propagation box.


When I bought the greenhouse they gave me an unused 3m heating cable with a built in thermostat, I built a box, layed out the cable on a piece of hardware cloth, fasten it with zip straps and buried it in between 2 layers of sand, which I keep moist. This should warm my seed trays, or anything I place on top of it, to about 20'c.


Some seeds that I am going to plant in one of the trays today.


I'm new to this, but I have sorted through my seeds and picked out these ones to start today, Snap Peas, Sweet Peas, Rosemary, Thyme, Parsley, Spinach and Green Onions.


The lights are on and are flooding the greenhouse.


My seed tray is filled and labeled, along with the yogurt containers with some Strawberry seeds I planted last week. You can see in the back ground my rooted Geranium cutting I potted up today.


It looks kinda empty right now but I'm sure it's not going to take long to fill.

Saturday, February 4, 2012

Surprise Bloom In The Greenhouse

On my daily visit to the greenhouse (I was checking on my Geranium and Fuchsia cuttings) I walked in and noticed this:


I'm glad I didn't step on it. Even with a layer of landscape fabric and about an inch or two of gravel, this crocus still managed to push it's way through. What a tough little flower.

Sunday, January 15, 2012

The Greenhouse Dream

For as long as I can remember, and as long as I have been passionate about gardening, I have always dreamt that one day, I would have my very own greenhouse.

It was 1997, and my future husband and I were attending the annual BC home and Garden Show. One of the exhibitors was BC Greenhouse Builders, they had on display one of their Twin Wall Polycarbonate Greenhouses. I recall so clearly, walking in and saying "Some day I want a greenhouse just like this". Being just 21, I didn't know exactly when this was going to happen, I just knew it was something to dream about.

Fast forward 15 years, now having established myself in a house with the space to accommodate such a dream, my only limitation was budget.

Having lived in my new house for 6 months and with the warm days of spring calling to me. My thoughts of gardening at the forefront, an article in the local paper caught my eye "Garden Room No Longer A Pipe Dream". Oh the excitement that article and pictures brought to me, it renewed my longing for a greenhouse. I showed my Husband and told him "Here it is, this is the greenhouse I was dreaming about" It was an article that featured a BC Greenhouse Builder greenhouse. The same one I saw 15 years earlier at the Garden Show.

I decided to clip out the article and mount it nicely on some card stock and display it in prominent place in my kitchen. I had recently watched an Oprah show on vision boards, where you put a collection of things be it pictures, words and such that represent your hopes and your vision for your life and serve as a daily reminder of your aspirations and what you want your life to be.
The article printed May 2oth, it was framed and put up in the kitchen as a daily reminder.


Being a believer in the power of positive thinking, I put it out there in the universe that I was looking for a greenhouse, hoping to attracted one to me.

http://www.oprah.com/spirit/The-Law-of-Attraction-Real-Life-Stories_1


Doing one of my usual craigslist searches for greenhouses, I came upon this posting. When I saw this I thought OMG this is it, this is the greenhouse I had been dreaming about. I have been looking on craigslist for years, even before I had the space for a greenhouse, and I can honestly say I have never seen a posting for this type of greenhouse. This is the exact one that I wanted, the one that only 6 days earlier I had put it out there is the universe to bring to me. Not only that but the $850 price tag was an attainable figure for me. A new one would probably run me about $3000 including taxes and shipping, and that wouldn't have been happening for at least a few more years.

I immediately e-mailed the seller, this add was posted on the 23rd of May and it was now the 26th. I thought that for sure it was going to be gone by then but it was worth a try. I didn't get a response and getting really antsy I sent another e-mail saying I was reeeeeeally interested in it and gave my phone # so as to avoid any delays. That night at about 7:30 I received a phone call from the seller, she said it was still available but she had someone who said they were coming the next day to look at it. Well, I didn't like the sound of that, being that it was only located about a 15 minute drive from me I asked if I could come tonight and take a look. She agreed and I was off, the sun was going down but there was still going to be enough light to take a good look. I arrived and said right away yes, and gave her $100 and said I would be back the next day with the rest and to start to dismantle it. It came with benches which was a bonus, and that was that, I now own a greenhouse!!

Choosing the site

Choosing the right site was important. I already knew when we purchased the home what area would make the perfect spot for a greenhouse. A place that gets the most light, with the longest wall facing south.

This was it, but first I needed to remove the tree and existing plant material that was in the way. I advertised the Plum tree on craigslist and had someone come and dig it up and take it away. The other plants were tired and just went into the green bag.

Next was to install the electrical, I dug the trench and my husband took care of the rest. Roughly placing the metal base to get an idea of where to run the electrical, where to remove the grass and where to dig for the base.

Next digging the trench, and leveling the ground.

Once the trenches were dug, I layed landscape fabric down not to prevent weeds but to keep the gravel and dirt separate. Adding the gravel to the trenches took some patience, stopping to make sure everything was level.

The one trick to this install, was the fact that the back yard isn't flat, there is a slight hill, right were the greenhouse was going to be sitting. You can see by this picture the west side is just above the level of the grass with the east side about a foot below.

Next, installing the metal flashing around the edge of the ceder posts.

Laying out and securing the front and back frame. Getting ready for installation.

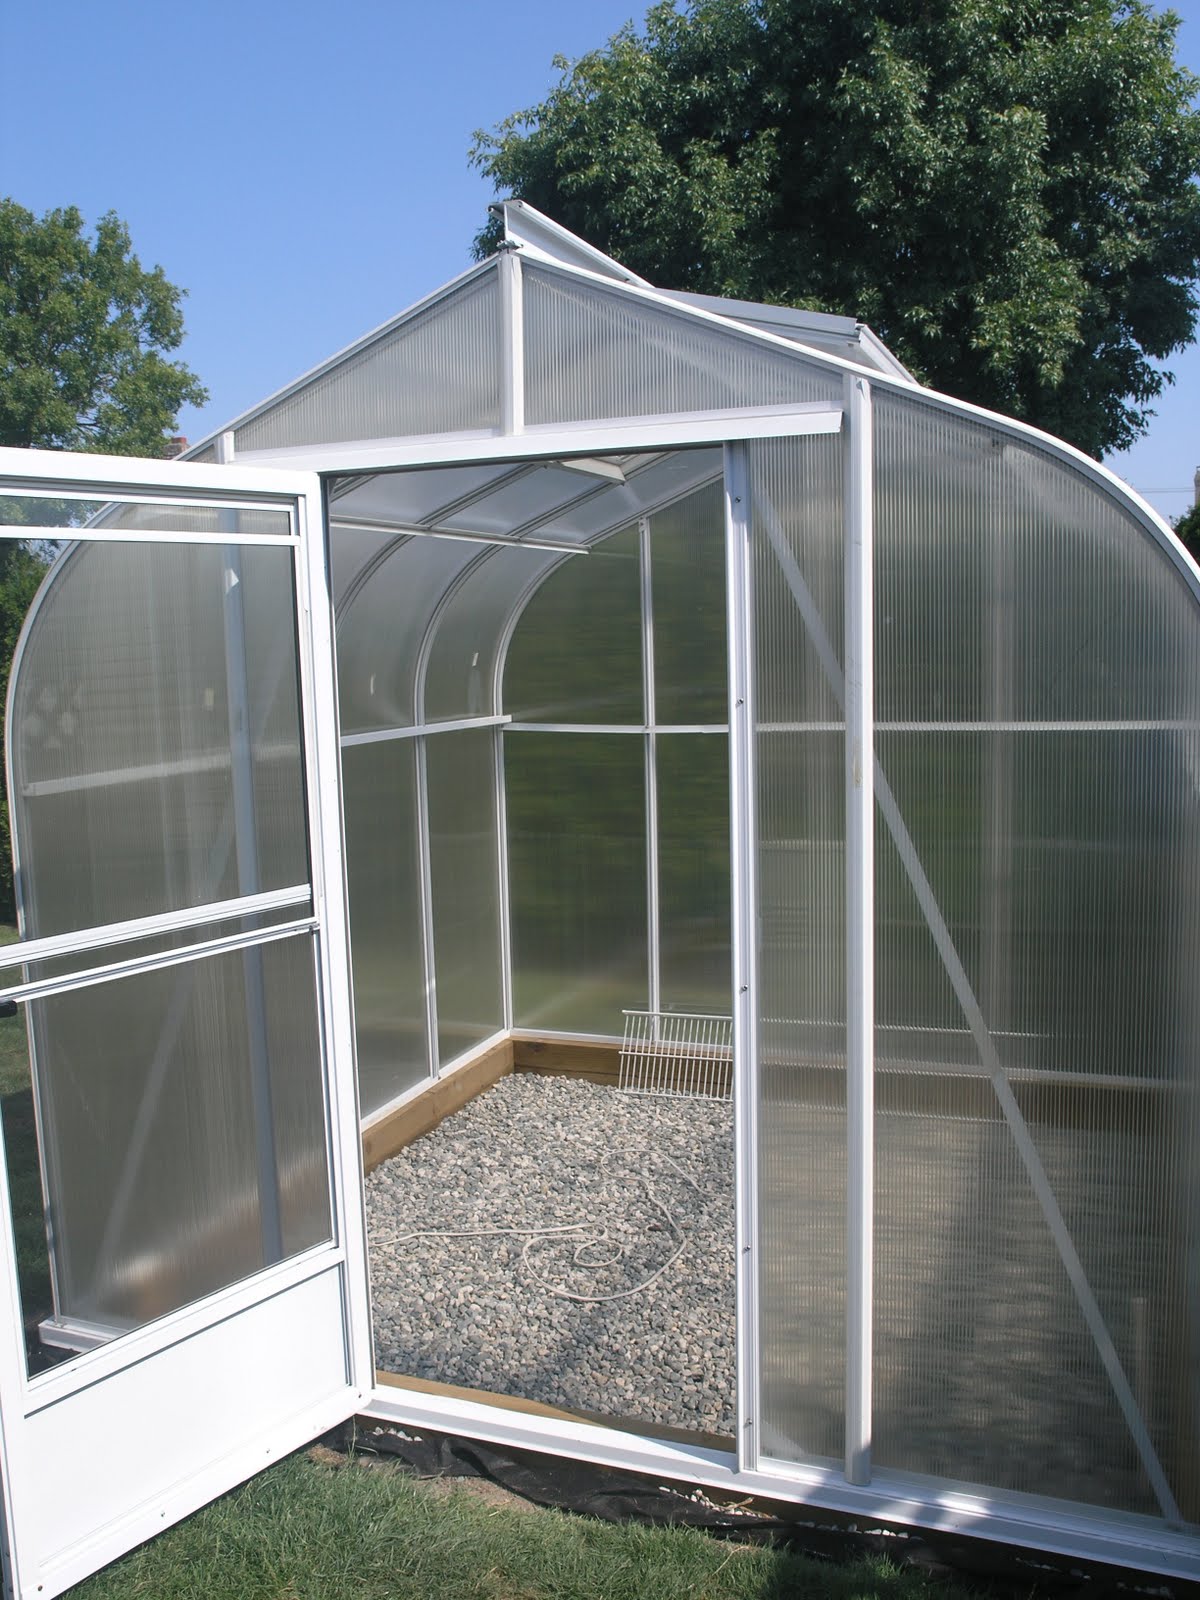
And up she goes, with the frame up and secured, next is to clean and reinstall the panels. I must tell you, it took a long time to get to this point. Weeks to clean all the framing of old caulking and washing and scrubbing the panels, a little sweat equity, but I was enjoying the process.

And here we have it, the final product, re-assembled and ready to grow. I started the process in May, I gave myself a time line of having it finished by the end of the summer and this was the September long weekend and it's done and I'm so happy.

It has two automatic vents.

To me a greenhouse represents endless possibilities.

Fast forward to January 2012, and with just a few things overwintering in the greenhouse, the fun is just beginning. With the seed catalogs arriving, I can now look at them with new eyes, so much more is now possible.

One thing I would have to say about this greenhouse, it is a BC Greenhouse Builder, the Sun Garden style greenhouse.

http://www.bcgreenhouses.com/hobby_greenhouse_kits/special_offer.php

When I phoned up a said I needed to reinstall my sun garden greenhouse they were more than helpful. When ordered the new foam tape they were able to tell me exactly how much I needed and had the special sealant and caulking needed also, to top it all off they sent me the installation manual and DVD. What service. I would highly recommend them if you are looking to buy a greenhouse. These are well build, I can vouch for that, considering this was the second time my greenhouse had been moved.

Monday, January 2, 2012

Front Garden Renovation Spring/Summer 2011

Front yard before the renovation

This yard has a lot of grass, which makes it look like a really large yard, however it doesn't take you on a journey. You can see it all from any angle, boring. I feel like the circle bed around the tree trunk is way to small for the canopy, it needs to be larger to balance out the tree.

Front yard before the renovation

The plantings around the tree are planted way to close, and upon closer inspection, the soil has been piled up around the base by a few inches, a no no. You always want to plant a tree at the same level as for which it was grown in the pot, or at the level from the first roots protruding out of the trunk.

Front yard before the renovation

Boring, your eye just goes right to the street, and the 20 year old junipers hide the front of the house. Even thought the front of the house doesn't get a whole lot of light, there are a lot more interesting plant material that can liven up the space.

After the removal of the junipers from the front of the house

After the removal of the junipers you can now see the brick underneath the windows. After breaking up and the turning the soil, I had some volunteer pumpkin seeds sprout. I wasn't planning on putting in any plant material till next year, so what better way to fill the space and for the kids to have the experience of growing their own pumpkins. I also planted some of the plants I brought over from the townhouse garden, my Stargazer Lily's and Red Azalea. I also moved the boxwood's from other area's of the yard.

A simple Red Geranium and Bacopa display was created in some terracotta pots. I have always loved the look of Geraniums in those pots, it has such a Old English kinda feel, the patina it develops over time is beautiful.

This picture was taken early in the morning, in the summer. You can see that this area does get a little direct sun, which is good to keep in mind when deciding on what to plant.

My little helpers are assisting in the creation of the larger circular bed around the tree trunk.

Now your eye doesn't go to the street, it is stopped by the new beds

I have created a new bed by the base of the street lamp and moved one of the existing mature azalea's, it was originally planted in front of the window between the junipers. Also planted there is a collections of found Iris's, Clematis Montana, being trained up the lamp post and a California Lilac, the bees will love. A new small bed was created by the Hedge that is now planted with a Hydrangea.

The new larger bed around the tree really shows off the beauty of the trunk. I will be filling it with naturalizing bulbs like Snow Drops, Grape Hyacinth, Daffodils, and some Lady's Mantle that I grew from seeds that volunteered themselves.

When renovating the garden, I didn't want to jump in and fill the space right away with plant material. Taking the time to study the soil conditions and light levels of each area of the yard is important. Leaving the garden beds prepared and ready for plants is a great thing to do. I'm really enjoying shopping for new plants, wandering the nursery's and knowing if I find something I love, there will be a spot available right away to plant it.

Sunday, January 1, 2012

It's Been A While, But I'm Still Here.

Spring 2011, front yard

Like the title says It's been a while but I'm still here. After moving from Richmond to Ladner in October of 2010, I was fortunate to purchase this beautiful 2 story 2500sq home with my Husband. As you can see from the picture above, this house has definite curb appeal, and a front yard that holds so many possibilities. It is on a lot about 45ft wide by 95ft deep, not sprawling by any means but, being a corner lot, we gain about 10 or so feet of city right of way, that is maintained as part of the property. North facing front with a south facing backyard, It was perfect for my green thumb.

Side front yard, with the "bonus" space.

As you can see from the photo above, the "bonus space" right of way really adds to the yard. Before the previous owners replaced the fence with an Emerald Green hedge, the fence went from the street side of the gate down the remaining length of the property.

Facing north, side "bonus" space.

Facing south, side "bonus" space.

As you can see there is a lot of grass at this point, but I have other plans. When I first looked at the back yard. I knew right away, where I was going to put my Greenhouse. I have always dreamt of having a greenhouse, that was defiantly on my list of must haves for a property.

South east corner facing north.

Back yard facing west.

As you can see from the picture, the back yard isn't very deep. Although it is south facing, it does hold some challenges in that the fence, and the side of the neighbours house, shade the yard to varying degrees depending of the time of day and season.

Back yard, facing east.

You can see from the shadow on the lawn, the challenge I was talking about. I will definitely have to do some research on shade loving plants for that portion.

South east corner

Back yard west corner facing east

South corner facing north down the fence.

Well that' the tour, sorry that it took me so long to get it posted. I was thinking last night as to why I haven't gotten around to posting an entry for a while. I really do like keeping an online diary of my gardening experiences, then it came to me. Since we moved, I no longer keep my laptop next to my comfy rocker recliner on the living room. It's been in the kitchen telephone nook, duh, why didn't I realize this before. So I have now moved the laptop to it's more comfortable location next to my chair. Just that simple. I will most certainly be keeping my online gardening diary more up to date from now on.

Oh and here is a picture of things to come. It has been over a year since we moved in and I have done a lot in that time so stay tuned.

A peak at inside the greenhouse, January 1, 2012